

Why do most office glass wall installations fail before the first panel even arrives on site? You understand that a modern workspace requires more than just a sleek look; it needs acoustic privacy and total structural integrity. The pressure to get your office glass wall installation exactly right is intense, especially when a single millimetre of error leads to wasted materials and blown budgets. It's common to feel uncertain about complex dry join systems or safety compliance when you're aiming for a high-end finish.
This professional checklist ensures your project is precise, safe, and completed with minimal disruption. We've distilled over 15 years of industry expertise into a streamlined procurement and fitting guide for 2026. You'll gain a clear understanding of the components required, learn how to verify acoustic performance, and master the logistics of a flawless install. Let's transform your floor plan into a productive, partitioned environment with absolute confidence.
Key Takeaways
- Master the site survey process by verifying exact finished opening dimensions and identifying floor deviations to ensure a perfect structural fit.
- Select the correct glass specification for your requirements, comparing standard toughened glass against high-performance acoustic laminate for superior privacy.
- Follow a methodical, step-by-step workflow for a professional office glass wall installation that minimises workspace disruption and ensures safety compliance.
- Identify the essential safety equipment and site preparation steps needed for a secure, rapid implementation using minimalist aluminium profiles.
- Streamline your procurement process by using online calculation tools for bespoke glass orders or selecting hardware-only kits for specific project needs.
Pre-Installation: The Essential Site Survey Checklist
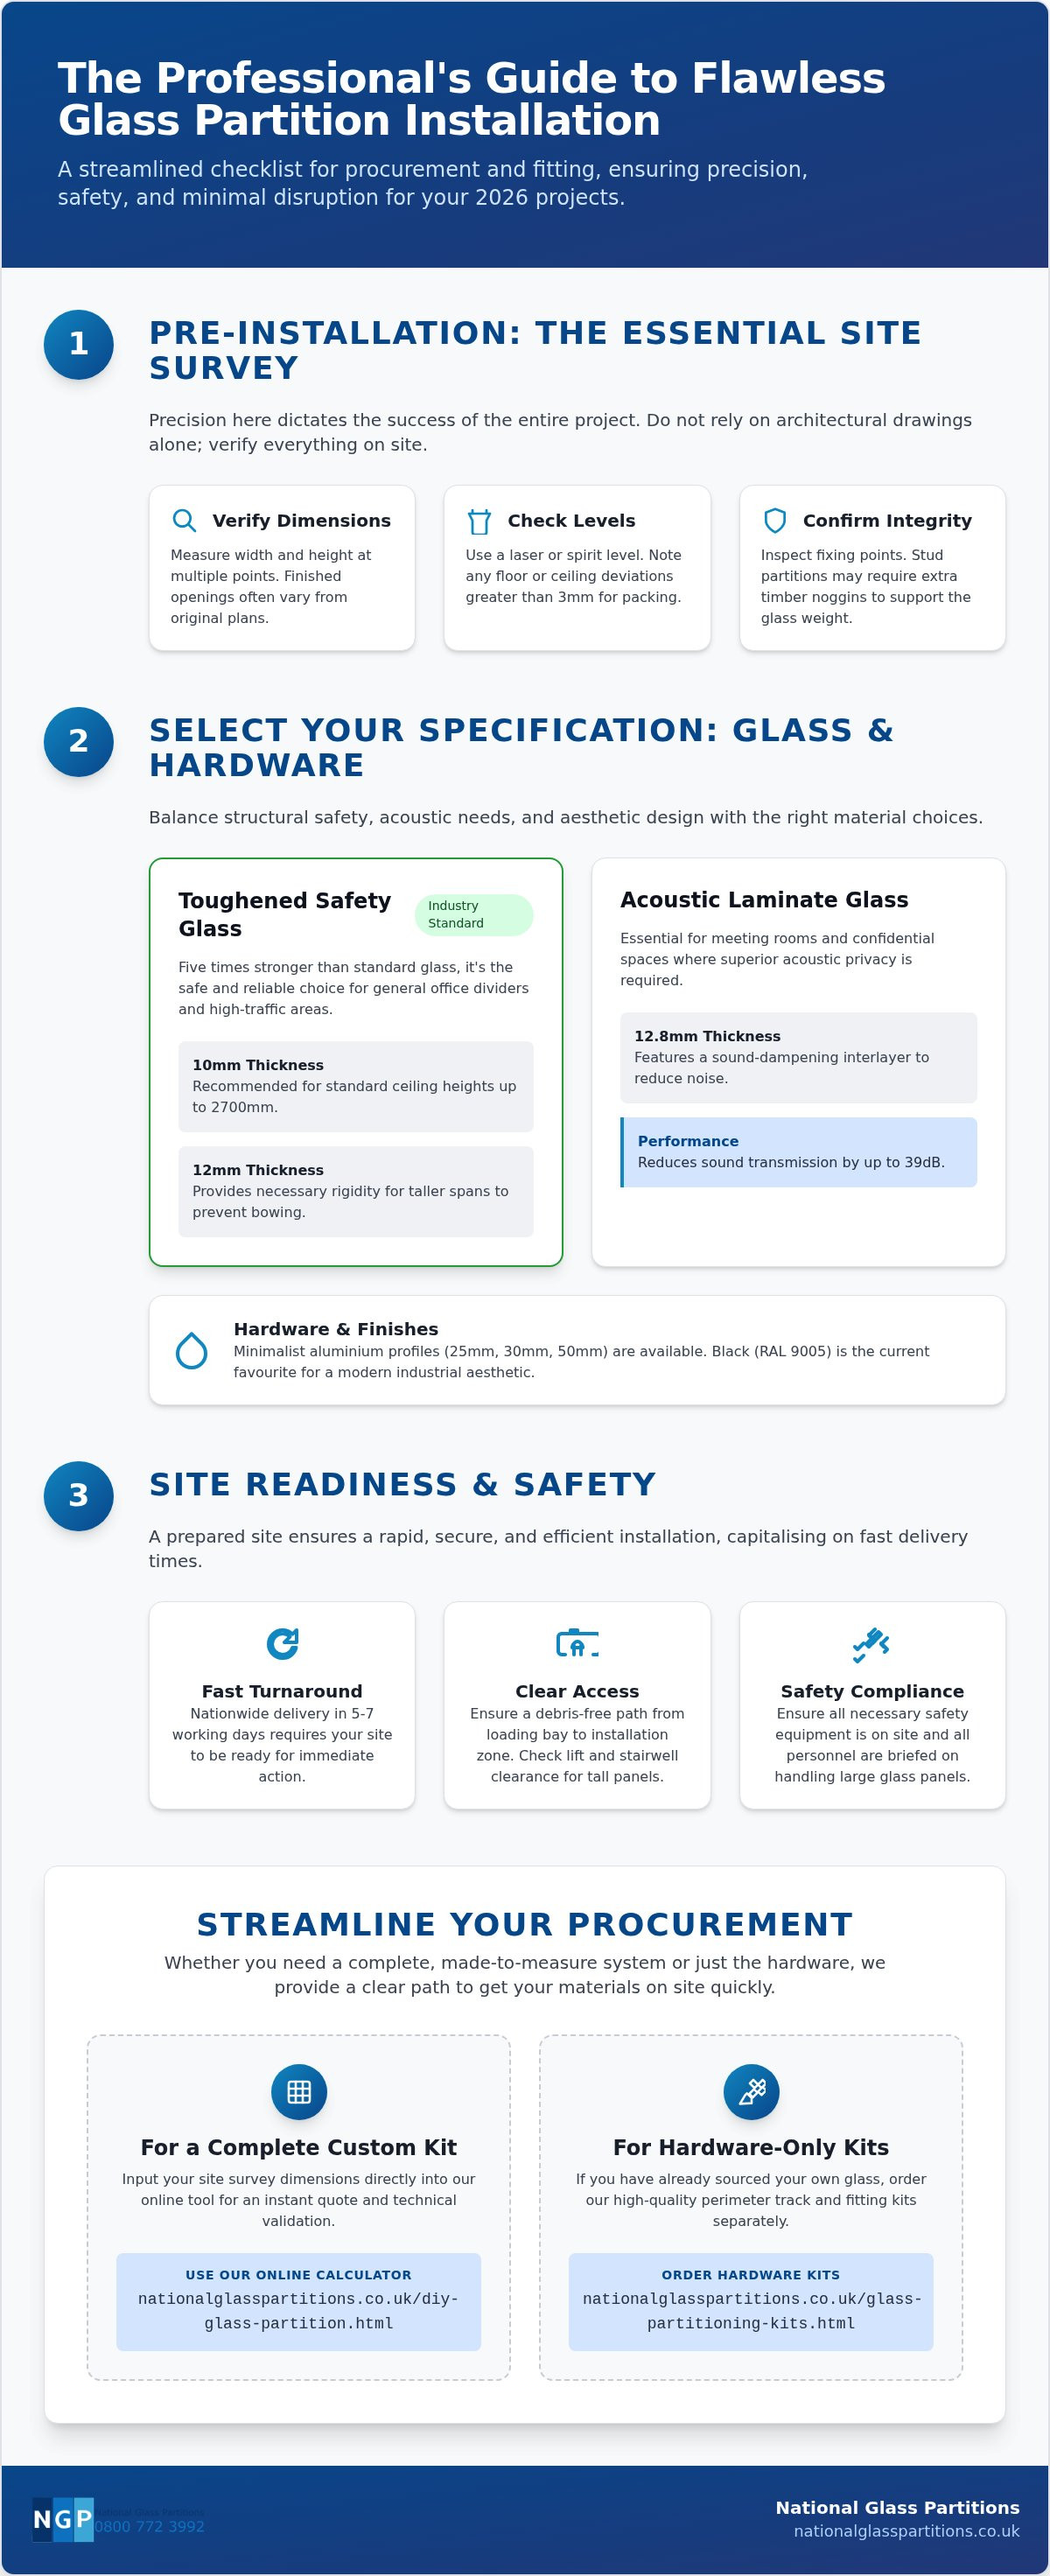
Precision in the site survey dictates the success of your entire office glass wall installation. Don't rely on architectural drawings alone. Finished openings often vary from original plans due to plastering, flooring, or structural settling. You must verify the exact width and height at multiple points to prevent ordering glass that is too large to fit or too small to be secure within the frame. A single miscalculation here can lead to costly delays and wasted materials.
- Verify floor and ceiling levels: Use a high-quality spirit level or laser to check for slopes. Identify any deviations greater than 3mm, as these require specific packing within the channel to ensure the glass sits perfectly level.
- Confirm structural integrity: Inspect the fixing points. Solid masonry provides the most stable anchor, whilst stud partitions may require additional timber noggins to support the weight of heavy toughened glass panels.
- Identify obstructions: Look for hidden hurdles. Dado trunking, heating pipes, and air conditioning vents frequently interfere with the intended run of the partition. Map these out before you finalise your order.
Measuring for Custom Size Glass Partitions
Accuracy is non-negotiable when dealing with made-to-measure glass. Use a laser measure to capture spans, recording heights at the left, centre, and right of the opening. Floors often sag amongst larger spans, creating a height difference that standard tape measures might miss. Once you have these figures, subtract the required tolerances for our minimalist 25mm aluminium channel system. For the most efficient procurement, input these final dimensions directly into our online glass partition calculator to receive an instant quote and technical validation. This tool simplifies the complex maths of deductions, ensuring your office glass wall installation starts with perfectly sized components.
Site Readiness and Delivery Planning
Logistics often present the biggest hurdle for trade professionals. Most competitors take weeks to deliver, but we provide direct nationwide delivery in 5 to 7 working days. This rapid turnaround requires your site to be ready for immediate action. Ensure a clear, debris-free path exists from the loading bay to the installation zone. Check lift dimensions and stairwell clearance for tall panels to avoid manual handling risks. If you already have your own glass and only require the hardware, you can order glass partition kits without glass to keep your project moving. Coordinate your labour to align with the 7-day window to maintain momentum and ensure the workspace remains productive.
Selecting Your Specification: Glass and Hardware Options
The success of your office glass wall installation relies on selecting materials that balance structural safety with acoustic performance. Your choice of glass thickness is usually dictated by the height of the partition. We recommend 10mm toughened glass for standard ceiling heights up to 2700mm. For taller spans, 12mm toughened glass provides the necessary rigidity to prevent "glass whip" or excessive bowing. Beyond the glass itself, the frame finish defines the workspace aesthetic. Black RAL 9005 is currently the favourite for modern industrial designs, though we offer 25mm, 30mm, and 50mm aluminium profiles to match any architectural requirement.
If you've already completed your site survey and know your dimensions, use our online glass partition calculator to configure your exact specification. This tool allows you to toggle between glass types and hardware finishes instantly, providing a clear path from design to procurement. For those who already have glass on site and only need the perimeter track, our glass partition hardware kits provide everything required for a professional frame setup.
Acoustic vs Toughened Glass: Which do you need?
Toughened glass is the industry standard for general office dividers. It is five times stronger than regular float glass and shatters into small, blunt pieces if broken, making it a safe choice for high-traffic areas. However, for meeting rooms where confidentiality is paramount, 12.8mm acoustic laminate glass is essential. This specialist glass features a sound-dampening interlayer that reduces noise by up to 39dB. You can also incorporate frosted or back-painted glass finishes amongst these options to provide visual privacy for executive offices without sacrificing natural light. If you are unsure which specification meets your building's acoustic requirements, speak with our technical team for a detailed assessment.
Channel Systems and Dry Join Technology
Modern office glass wall installation has moved away from messy, time-consuming silicone applications. We utilise 'dry join' technology, which uses a clear I-section or H-section joint between glass panels. This creates a seamless, translucent vertical line that is both aesthetically superior and much faster to install. When selecting your channel, consider the ease of the build; a two-part channel system often allows for simpler glass insertion compared to a standard U-channel. Ensure your gaskets are precisely sized for your chosen glass thickness, whether it's 10mm, 12mm, or 12.8mm, to guarantee a rattle-free, airtight finish that maintains the partition's acoustic integrity.
Site Readiness and Safety Preparation Checklist
Preparation is the bridge between a chaotic site and a seamless office glass wall installation. Before the delivery vehicle arrives, clear the installation zone of all furniture, loose cabling, and debris. You need a completely unobstructed workspace to manoeuvre large glass panels safely. Ensure all personnel are equipped with the correct PPE. Safety boots, high-grip gloves, and eye protection are non-negotiable requirements when handling toughened glass. Organise professional glass suction lifters and a heavy-duty glass trolley to transport the panels across the site without risk of edge damage.
Structural readiness is equally vital. Confirm that your ceiling track will be fixed into a solid timber or metal ground. Fixing directly into plasterboard without a structural noggin will eventually lead to partition failure. If your site is already prepared and you only require the perimeter tracks and gaskets, you can order our glass partition kits without glass for immediate dispatch. This hardware-focused solution is ideal for trade professionals who have already sourced their own panels but require a premium aluminium channel system.
Tools Required for a Professional Finish
Precision requires the right hardware. A high-quality spirit level or a cross-line laser is essential for vertical alignment amongst various floor levels. For masonry fixings, an SDS drill is required, whilst metal-drill bits are necessary for fixing into steel structures. Don't forget glass setting blocks. These small but critical components sit within the floor channel to prevent the glass from touching the metal, which avoids edge damage and potential breakage. If you are still in the procurement phase, use our online glass partition calculator to ensure your hardware specification matches your glass dimensions perfectly.
Health and Safety Considerations
Handling glass carries inherent risks that must be managed with logistical discipline. Never attempt to lift panels alone. Always work in pairs or larger teams, using professional suction lifters to maintain a secure grip. Before drilling into floors or ceilings, use a detector to check for hidden cables or pipes. This is particularly important in modern offices with underfloor heating or complex data trunking. Finally, secure the work area. Use safety tape or barriers to prevent unauthorised access whilst the glass is unsecured. This protects both your team and other site occupants during the critical phase of the office glass wall installation.
The Installation Phase: A Step-by-Step Guide
Successful office glass wall installation moves from the perimeter inwards. Once your site is prepared, start by fixing the aluminium head and floor channels into the openings you've measured. Use appropriate fixings every 300mm to 500mm to ensure maximum stability against the structural ground. Vertical wall channels must be perfectly plumb; use your spirit level or laser to verify this before tightening any fixings. If you are working with an existing glass supply, our glass partition kits provide the professional-grade aluminium tracks needed to complete this framework with total precision.
Place setting blocks in the floor channel to support the glass panels. These blocks are critical as they prevent the glass from touching the metal, which avoids edge damage. Carefully lift the glass into the head channel first, lower it onto the blocks, and slide it into the vertical wall channel. Repeat this for each panel, applying the clear 'dry join' strips between the glass edges. This silicone-free method ensures a flush, translucent finish that is ready for immediate use without the drying time associated with traditional sealants.
Setting the Channels and Tracks
Alignment is the foundation of a professional build. Ensure the head and floor tracks are perfectly vertical to each other to avoid the glass leaning or putting pressure on the gaskets. You must insert the rubber gaskets into the aluminium channels before the glass is positioned. This creates a secure, rattle-free fit and maintains the acoustic integrity of the system. For bespoke projects, our online glass partition calculator ensures you receive the correct gasket length and profile for your specific track run.
Fitting Doors and Ironmongery
For partitions featuring frameless doors, install floor-mounted hydraulic hinges to ensure a smooth, controlled closing action. Align the door leaf with the adjacent side panels, maintaining consistent gaps of 3mm to 5mm for a professional appearance amongst the glass. Fix the D-handles or lever latches into the pre-drilled holes provided in your custom order. Ensure all ironmongery is tightened correctly but avoid over-tensioning, which can stress the toughened glass around the cut-outs. A well-aligned door is the hallmark of a high-quality office glass wall installation.
Completing the Project: Snagging and Handover
The final phase of an office glass wall installation is where the details define the overall quality. Once the physical structure is in place, you must transition to a rigorous snagging process. Clean all glass panels using a non-abrasive professional glass cleaner to remove suction cup marks or site dust. This isn't just for aesthetics; it allows you to spot any surface defects or tiny chips that might have been missed during the build. Ensure all silicone-free dry joins are perfectly flush and that the rubber gaskets are fully seated within the aluminium tracks. Any protrusion in the gasket will compromise the acoustic seal, negating the benefits of your specialist laminate glass.
Testing the moving parts is the next priority. Test the operation of all doors and hydraulic hinges for speed and alignment. The door leaf must sit perfectly square amongst the fixed panels, with consistent gaps on all sides. Adjust the hinge tension to ensure a safe, controlled closing speed that prevents accidents. To comply with current building regulations, apply glass manifestation at the correct heights. These visual markers are a legal requirement for large glass spans, preventing occupants from walking into the partitions. If you need to order additional components or manifestation kits, our online glass partition calculator is the most efficient way to specify your requirements.
The Final Snagging List
A methodical inspection prevents future call-backs and ensures the longevity of the partition. Walk the perimeter of the installation and look for gaps where the aluminium channel meets the wall or ceiling. Small voids here can lead to significant sound leakage, undermining the privacy of meeting rooms. Ensure all ironmongery screws are tightened and that all decorative covers are fitted securely. Check for any scratches that may have occurred during the final move-in of office furniture. If you find you are missing a specific hardware component, our standalone glass partition kits provide the necessary hardware to rectify any onsite issues quickly.
Maintenance and Long-Term Care
Preserving the high-end finish of your office glass wall installation requires minimal but specific care. Avoid using harsh chemicals or abrasive cloths on the aluminium channel powder coating, as these can dull the RAL finish over time. Warm soapy water is usually sufficient for the frames. Periodically check the door hinge tension to maintain safe closing speeds, especially in high-traffic areas. This proactive maintenance ensures the system remains safe and functional for years. For the quickest start to your next project, use our online glass partition calculator to get an instant quote and technical validation for your bespoke workspace design.
Master Your Workspace Transformation
Achieving a flawless office glass wall installation depends on the transition from meticulous planning to rapid execution. You've learned that success begins with a laser-accurate site survey and ends with a rigorous snagging process that ensures acoustic integrity. By selecting high-performance materials like 12.8mm acoustic laminate and utilising silicone-free dry joins, you're investing in a professional-grade environment built for the modern era.
We bring 15+ years of trade expertise to every order, offering direct-from-manufacturer pricing that keeps your project within budget. Our logistical network ensures 7-day UK nationwide delivery, so your workspace remains productive without traditional lead times. Whether you're ordering bespoke panels or hardware-only kits, you're equipped to deliver a premium finish with total confidence.
Take control of your office layout today and create a space that reflects your professional standards with ease; if you are also looking to enhance a reception or lounge area with a premium feature stove, learn more about Blue Oak Fireplaces to see how their bespoke heating solutions can elevate your workspace.
Frequently Asked Questions
Can I install an office glass wall myself or do I need a professional?
You can manage the installation yourself if you have basic trade skills and a capable partner. Our systems are designed for straightforward assembly, provided you follow the site survey checklist precisely. For those confident in their DIY abilities, our online glass partition calculator provides a complete bespoke kit. If you already have the glass, you can simply order our glass partition kits without glass to complete the frame framework.
How long does the average office glass wall installation take?
A standard single-run office glass wall installation typically takes one working day for a two-person team. This timeline assumes the site is clear and the channels are already fixed. More complex corner configurations or multiple glass office pods may extend the project to two days. Preparation is the deciding factor in speed.
What is the difference between toughened glass and acoustic laminate glass?
Toughened glass is a single pane heat-treated for strength and safety. It's the standard choice for most office dividers. Acoustic laminate glass consists of two glass layers bonded with a specialist noise-dampening interlayer. This interlayer targets sound frequencies to achieve a 39dB reduction, making it the superior choice for private meeting rooms where confidentiality is a priority.
Do I need planning permission for internal glass partitions in the UK?
Planning permission is rarely required for internal glass partitions as they don't alter the external structure of the building. However, you must comply with UK Building Regulations regarding fire safety and manifestation. You should also obtain "Licence to Alter" consent from your landlord if you are in a leased commercial property.
What are 'dry joins' and are they better than silicone?
Dry joins are translucent plastic sections that clip between glass panels. They are significantly better than silicone for modern office glass wall installation because they eliminate drying time and the risk of messy finishes. They provide a perfectly consistent vertical line and allow for easier glass replacement if a panel is damaged in the future.
How do I ensure my glass partition meets safety regulations?
Your partition must use safety glass marked with BS EN 12150 or BS EN 14449 standards. You must also apply manifestation at two levels, typically 850mm to 1000mm and 1400mm to 1600mm from the floor, to ensure the glass is visible. This prevents accidental collisions and ensures your workspace remains legally compliant.
Can glass partitions be installed on top of existing carpet?
We do not recommend installing glass partitions directly onto carpet. The floor channel should be fixed to the solid subfloor to ensure structural stability and a proper acoustic seal. Installing over carpet leads to movement in the glass and allows sound to leak through the pile, which compromises the privacy of the room.
What happens if my site measurements are slightly out when the glass arrives?
Our minimalist aluminium channels offer approximately 10mm to 15mm of tolerance. If your measurements are out by a few millimetres, you can often compensate by using setting blocks or adjusting the glass depth within the head track. If the deviation is larger, the glass may need to be recut, which is why we emphasise using a laser measure during the survey.


